Welcome to the tutorial. Select an option from the menu.
After installing, the program should start automatically.
An icon for Install-Block will appear in your Notification Area (System Tray). If you don't see the icon, it may be hidden -- click the arrow to access it.
Right-click the icon and select Settings from the menu.
You can also use a hotkey -- the default is Windows Key + Ctrl + I.
A window will appear asking for your password.
As indicated, the default password is admin.
Next, the Config screen will appear. We need to set up new passwords, so click General from the menu at left, and then the Change Passwords button.
The Config password is used to gain access to the Config window, as well as to unload or disable Install-Block.
The Unblock password is used to gain access to a program (such as an installer) which has been blocked by Install-Block. The default Unblock password is simply "password".
You'll want to use this dialog twice in order to change each of the two passwords.
When you are finished changing the passwords, click Done.
The Black List is a list of words or phrases that Install-Block will look for in the title of a window, blocking access upon finding those words.
There are a few default entries that will block nearly every installation program.
(Note that installers are often composed of multiple windows, not all of which are visible to you, and Install-Block is able to target those hidden windows as well, for effective blocking.)
Click on Add to add a word or phrase.
It is recommended that you be as non-specific as possible when adding phrases to your Black List. For example, if you hypothetically wanted to block all access to Notepad, you would want to blacklist "Notepad" and not its full default title "Untitled - Notepad".
When adding your own phrases to the Black List, you can use the option "Must match window title exactly". This ensures that only windows with an exact match to the given phrase will be blocked. For instance, one of the default Black List entries is "Services". This entry will block a window titled "Services" but would not block a browser window titled "Printing Services". Black List entries that are added as exact match will appear in bold font.
To block some common Windows features, such as the Control Panel, click on Add From Presets on the Config Screen.
Note that while Install-Block does work against websites, it is not ideal for this purpose. One reason is that a single browser tab being open to a blocked website will result in the entire browser window being blocked.
To block a website with the Black List, you need to add the title of the website, not the web address. Being non-specific, as noted earlier, is also important, so take note of what words are shared amongst its page titles.
You can also use your browser settings to block specific domains, and then block the settings page. However tech-savvy users could use a proxy site to bypass a domain restriction.
If you want to block ALL websites except for specific ones, you can do this easily with a combination of the Black List and White List. Add your browser name (for example, Mozilla Firefox, Microsoft Edge, or Google Chrome) to your Black List, and then the name of the allowed site(s) in your White List. One important caveat: an additional step is needed because of how browsers behave. Until a page loads, the title of the window will not contain the title of the page, but merely the web address. For example, let's say you want to allow access to bashsoftware.net. You might add "Bash Software" to your White List, as that is contained within the title of the page. But when you navigate to our site, your browser will briefly show only the web address in the titlebar, "https://bashsoftware.net". Therefore, you would also want to add "bashsoftware.net" to your White List, so that the browser is not blocked while it loads the page and the title that we have given it.
With these settings, if a user navigates away to any page other than Bash Software, it will be blocked. Make sure that your homepage is set to an allowed page.
No windows will be blocked while the Config screen is open.
The White List works in the opposite manner of the Black List. When words found in the White List appear in a window's title, that window will not be blocked, even if the title also contains a Black List word.
For example, if you open a text document named "install_notes.txt" in Notepad, Install-Block would normally block this window due to the word "install" in the title. However, adding "Notepad" to the White List ensures that this program is always allowed and never blocked. Similarly, adding "Page Setup" to the White List can prevent the blocking of printing-related screens.
There is also an option on the White List screen called Block all top-level windows except for those listed above. With this option enabled, all top-level windows are blocked, except for those matching an entry in the White List. A top-level window is one that is not owned by another window -- typically those appearing in the Windows Taskbar.
If, for example, you wanted to only allow the browser Microsoft Edge, you could enable this option and then add Microsoft Edge to your White List. This would allow Microsoft Edge while blocking all other programs. The Black List can still be used to block child windows, such as an allowed program's Options screen.
Records to the event log each time a window is blocked. The following information is recorded with each event: Date/Time, Windows User name, Window Caption (title of the blocked Window), Process Filename (the location and filename of the program), Result (either Access Granted or Access Denied).
Don't show the password prompt when blocking a window. Instead, terminate the window without user interaction.
When a window is created or activated that is due to be blocked, it is immediately terminated, and there is no password-prompt shown. If you want to give some feedback to the user, you can use the Show message to user feature to display a message box.
Prevents access to the Windows Start menu. This feature will behave differently depending on your Windows environment:
Don't allow Logoff or system Shutdown/Restart
This feature is available only under Windows XP or 2000. Whenever a user attempts to log off or shutdown/restart the computer, a password prompt is shown (requiring the Admin password). If they are unable to provide the password, the operation is cancelled. This feature does not prevent Windows XP's Switch User feature, therefore Fast User Switching should be disabled. It also cannot prevent a user from shutting down the computer by using the computer's power button.
Don't block windows owned by System processes
This option will allow any window which has been created by a process running under the System account. System processes are those which run at all times, even when no user is logged in to Windows (any program executed by a user will not be a System process). You can see which processes are running as System using the Windows Task Manager (you can also manage them by entering services.msc at the Run dialog).
It is important to have "Task Manager" and "Services" in your Black List. A typical user should rarely require the use of the Task Manager, and the additional time spent granting access to a blocked Task Manager will be worth the added security.
If a user can access the Task Manager, and has admin rights, they can terminate the Install-Block process (bsibr.exe or bsib.exe). The "Services" exact-match entry blocks access to the services.msc control panel.
Look through the presets available from the Black List section of the Config screen, and consider adding many of these phrases.
Users booting into Windows' Safe Mode may be able to bypass system protections and security functionality. To reduce this risk, users with standard credentials should be prevented from using Safe Mode options to log in. Click Start, click Run or the search box, type in Regedit, and click OK. Navigate to HKEY_LOCAL_MACHINE\SOFTWARE\Microsoft\Windows\CurrentVersion\Policies\System and create a new DWORD key called SafeModeBlockNonAdmins with a value of 1.
You can also prevent boot options from appearing by running the following commands in a Command Prompt with Admin privelages:
bcdedit /set {bootmgr} displaybootmenu no
bcdedit /set {current} bootems off
bcdedit /set {current} advancedoptions off
bcdedit /set {current} optionsedit off
bcdedit /set {current} bootstatuspolicy IgnoreAllFailures
bcdedit /set {current} recoveryenabled off
Lastly, you can disable (or more accurately, break) Safe Mode entirely, in this unofficial way: click Start, click Run or the search box, type in Regedit, and click OK. Navigate to HKEY_LOCAL_MACHINE\System\CurrentControlSet\Control\SafeBoot and rename Minimal and Network to Minimal.bak and Network.bak.
Users may bypass the normal startup procedure by using a bootable CD or USB drive. You can usually disable this in your system's BIOS. To access your BIOS, press a certain key during the initial boot stage (varies by manufacturer). Set your hard drive as the first boot device and password-protect the BIOS to prevent changes.
If you choose not to take most of the steps outlined above, you may wish to delete this tutorial file after reading it.
If you experience any issues with Install-Block not loading automatically with Windows:
Click Start, type "services.msc". Find "Install-Block Launcher Service" in the list of services, right-click, and choose Properties. Change the Startup type from "Automatic" to "Automatic (Delayed Start)".
Please note that the program currently cannot display non-English characters, however it does support Unicode internally. Thus, if you add, for example, Chinese characters to your Black List, the characters will display as question marks. Install-Block will still correctly block windows that contain the blocked Chinese phrase.
For organizations or others with a license for multiple computers, it can be useful to automatically set your preferred settings during the setup process. To do so, first configure an existing instance of Install-Block the way that you want it, and save your settings.
Next, open the following folder in Explorer: C:\ProgramData\Install-Block (the folder and/or files may be Hidden, and can be un-hidden using the Folder Options. In Windows 11 you can find this options dialog by clicking the three dots in the Explorer toolbar; in earlier versions look under the View or Tools menu.)
Copy the .dat files and paste them into the same folder as the Install-Block setup program. Now when you run setup and install the program on a new computer, the settings files will be copied into the new installation.
Organizations or others with a license for multiple computers may want to speed up installation by running the setup program in silent mode, which will install the software without any user interaction. To do so, right-click the setup file (eg InstallBlockR.exe) and choose Create Shortcut. Now right-click the new shortcut file and go to Properties. In the Target box, add " /S" to the end, after ".exe". Click OK and run the shortcut.
Note: When using these network features, be sure that Install-Block is not being firewalled on any of the involved systems. The networked computers should also be in the same Workgroup.
The Administer Network feature allows you to copy settings to all (or some) of the computers on your network. This feature makes it easy to update all of your computers, after adding new phrases to your Black List, for example. Administer Network is found under the Tools section of Config.
All of the computers on your network, in the same Workgroup, (which are turned on and have an active connection) will be listed to the left. You can click the button to Select All computers, or you can select only certain computers by holding the Ctrl key as you click. Select the settings you wish to copy from the list at the right and then click Copy Settings to Selected Computers. This process could take a few minutes, depending on the number of computers. Note that in order for settings to copy, the selected computers must have Install-Block actively running at that time.
In addition to copying settings, you will notice six icons, under the computers list. From left to right these are: Refresh computer list, Select all computers, View log of one computer, Download logs of selected computers (as .txt files), Put Install-Block into Disabled mode on selected computers, and Put Install-Block into Enabled mode on selected computers.
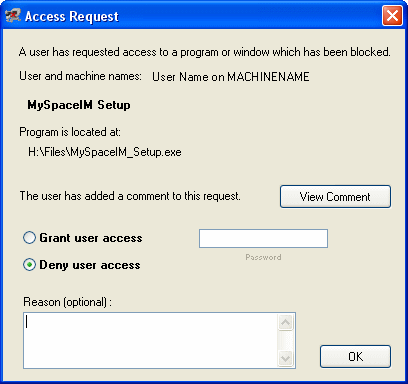
Install-Block makes it easy to secure an entire network. The most important tool in this regard is the Remote Access Requests feature. You can designate one (or more) computers to act as Admins, and other users on the network will be able to ask for the right to unblock a setup program or other window. To configure this feature, click the Configure Remote Access Requests button, under the General section of Config.
On the computer to act as an Admin, choose the third option, This machine will be used by an admin and will accept access requests from others. You can leave the Port at the default. Install-Block must be running at all times in order for the admin to be able to answer requests, but if you do not want Install-Block to actually be blocking programs on that computer, you can go to the Startup section of the Config screen and tick the checkbox to start the program in Disabled mode.
While still on the Admin computer, click the Windows Start button, then search for "System". Your computer name will be shown at the top.
(On earlier versions of Windows, go to your Control Panel, open the System properties, then click the Computer Name tab (don't include the trailing period in your computer's name).
On a user's machine now, open the Configure Remote Access Requests dialog and choose the second option, Enable remote access requests from this computer. Enter the name of the Admin computer that you had taken note of, and be sure the port is the same as what is used on the Admin computer.
When a user receives a password prompt, after attempting to install a program for example, they will click on the Request Access button (already clicked in the screenshot). After optionally entering a message for the administrator, they click on Send Request.
The admin, at his/her computer, receives a message that another user has requested access. The admin can see the title of the blocked window, the associated filename, and the user's comment, as well as the name of the computer sending the request and the user who is logged on to it. The admin can then choose to grant or deny the request, as well as send back a comment of his own.
If the administrator approved the request, the user's password prompt will close and the blocked program will appear, ready for use. If the request was denied, the prompt will close and the restricted program will be terminated.
If a user's machine cannot be networked with an administrator -- if, for example, employees take laptops with them in the field -- a one-time-use password can be provided over the phone or via email. The user will be able to use the given password to access a blocked program (and only the program he requested access for), but the password will not work again in the future. The password is specially generated to be used to unblock a specific program on a certain computer.
The administrator will launch Config, and then click on the Generate One-Time Password button, under the Tools section. The admin enters the information provided by the user, and clicks Generate Password. The filename of the program will be displayed for review, and the password -- which should then be given to the user -- will be generated.
Note that installation programs often times will create more than one window, and that these will require unblocking individually. Therefore if you are giving a password over the phone, you should stay on the line until the installation process has completed. Normally, when a password is entered to unblock a window, Install-Block grants access to all currently blocked windows. When using One-Time-Use Passwords however, this does not occur, so that other programs that you cannot be aware of aren't unblocked.
Starting with Install-Block v2.5, you MUST have administrative rights to install Install-Block, and you MUST have admin rights if you ever need to manually run the program using the "Manual Start" shortcut.
Install-Block runs a process in the background as a Windows service, responsible for launching the main program upon user login. If your startup settings specify that it should not launch at start, or not launch for the current user (by user name match) then you can start the program manually with the Manual Start shortcut. This is advisable as a temporary measure only, as you should configure the program to run automatically.
Note: When you run the Manual Start shortcut, it will display a dialog. If you want to suppress the dialog:
Right-click the shortcut to Manual Start, and click Properties. In the "Target" box, append "silent" to the end, so that your shortcut now looks like this:
"C:\Program Files (x86)\Bash Software\Install-Block\IBjumpstart.exe" silent